
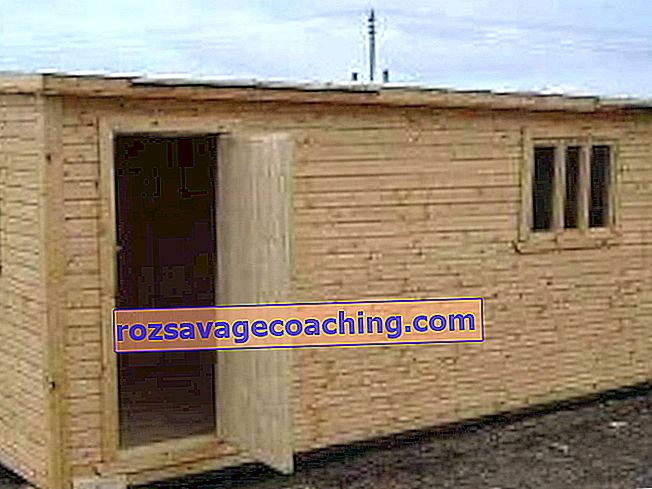
The change house 3 by 6 is considered a multifunctional structure, which can be both suitable for temporary residence during the construction of a residential building, and serve as a workshop, a place for storing various things and household equipment. In the summer, a change house of this size can be used to equip a bath or shower. To build such a structure, you need to have at hand the drawings, the necessary building materials and some experience, since the construction must be carried out in compliance with all technologies.


Choosing a design
During the construction of a cottage or a large house, one cannot do without a temporary dwelling, where builders could rest. Installation should be quick and cost effective. An excellent option for solving this problem is to install a 3x6 m frame change house with your own hands. In the future, it can also serve as a spacious place for storing old things, household equipment and a bicycle.
To assemble a change house of 18 m2, you must first decide on the choice of its design.


To do this, you can do the following.
- Buy a ready-made container. It only needs to be installed on a gravel dressing. This type of cabins is considered the most affordable and simple. The only thing that may be difficult during transportation.
In addition, it is difficult to make openings in ready-made containers. Due to the large volume of metal, such structures are expensive.

- Make a frame structure. This is the most optimal solution, since construction does not require large financial costs. The frame can be made of wood or metal. Wooden structures are easily fixed on the foundation, quickly disassembled and look attractive in the landscape design of the site. In metal structures, the frame is welded, they are characterized by strength and durability.
The only thing is that metal cabins are expensive and heavy, which makes transportation difficult.


- Apply the panel board method. This is the simplest option for making a change house, for the installation of which a shield is first assembled from frames and boards. The frames are assembled on the ground, after which they are covered with boards, as a result, a box is obtained. The manufacture of the change house is completed with flooring and sheathing of surfaces such as the ceiling and walls, for which they usually use sheets of chipboard or plywood. In addition, doors are installed.
The disadvantage of such types is that they can be operated only for one season, due to the lack of load-bearing elements, they cannot withstand heavy loads and frosts.


Once the type of construction is selected, it remains to resolve the issue with the preparation of documentation. For this, a draft of the future change house and an estimate are being prepared. The 3x6 m building is considered universal, since it can serve as a place for rest, a bath, and a workshop or storage room. Usually, when creating projects, a typical scheme with a living room and a vestibule (13.5 and 4.5 m2) is chosen. Optionally, you can add partitions that will separate the storage room, kitchen and bathroom from the living room. In the drawings, window openings and internal doors are necessarily indicated.
As for the estimate, in order to correctly calculate the entire cost of building a change house, you need to take into account not only the cost of purchasing building materials, but also the cost of their delivery and installation.
To save money on construction, many owners of summer cottages and construction sites prefer to do the installation with their own hands, this allows you to significantly save on hiring craftsmen.


Necessary materials
Before starting work on the construction of a 3 by 6 change house with your own hands, it is important to choose the right building material and calculate its amount. For buildings of this type, the installation of a pile or columnar foundation is usually chosen. Therefore, depending on the type of foundation, you will need to purchase piles (pillars) or make a crate that will be filled with concrete. You may need metal or wood to make the frame. External finishing is usually done with clapboard, siding, profile sheets or block house, the finishing material is chosen according to the design project of the change house.


Great attention must be paid to the choice of material for insulation. Glass wool or foam can be a budget option, while the seams can be sealed with construction foam. In order to be able to use the change house in winter, it is also necessary to provide for the insulation of the floors, laying hydro and heat insulating material. To decorate the change house inside, you can use both moisture-resistant panels made of PVC, MDF, and lining. As a rule, plastic, iron or wooden doors are installed on doorways. The same applies to the design of window openings, they can be decorated with plastic or wooden frames.
The installation of the roof, which can have a single or gable structure, is also considered important. To prevent rainwater and snow masses from accumulating on its surface, it is necessary to observe a slope angle of no more than 20 degrees. Cover the roof with slate or profiled sheet.


Where to locate?
At the stage of creating a change house project, you must also decide on the location of its placement. To do this, you should know whether it will be a stationary structure or a structure with the ability to disassemble and move. If it is planned to install a temporary change house at the dacha for use for several years, then it should be folding, so that later it can be easily transported to another summer cottage or sold.
In addition, the placement location largely depends on its intended use . If the structure will also be used for household purposes, then it is recommended to install it next to a residential building. This provides quick access to the building from any corner of the site.
Some summer residents often operate the building as a comfortable shower room, bathroom or kitchen - in this case, it should be located away from the main housing, as required by fire safety standards.


Step-by-step construction instructions
A change house 3 by 6 is very simple to build with your own hands, the most important thing is to first draw up drawings, correctly determine the dimensions and calculate the consumption of building materials. At the same time, experts recommend initially planning the change house project in such a way that it could become part of other structures in the future. To independently build a 6x3 change house from scratch, you should perform the following steps in order.
- Prepare the construction site. To do this, you need to select an area with a flat surface and solid soil. Otherwise, additional earthworks will have to be completed, and this will require both time and money. The place where it is planned to build a change house is carefully cleaned of debris and plantings. If necessary, leveled with a layer of rubble.

- Install the foundation. To do this, remove a layer of earth by 30 cm over the entire area of the change house, protruding beyond the perimeter by 0.5 m. The soil should be replaced with a layer of sand and everything is well tamped. Additionally, it is recommended to lay geotextiles - this will increase the durability of the future structure. The base can be installed both from cast concrete, cinder block, brick columns, and from monolithic blocks. The pillars are buried to a depth of 300 mm and higher, they are laid strictly along the cords, previously set horizontally, adhering to the drawing. For a change house with an area of 18 m2, you will need 15 columns, of which 5 need to be laid in length and 3 in width. It is important to maintain a distance of 1.5 m between the columns.
After that, the freshly laid foundation is left to dry for one week, suspending all construction work.

- Make a frame. Previously, according to the drawings, wood is cut, which is then treated with hydrophobic agents and an antiseptic. During wood processing, fire safety must be strictly observed, preventing the appearance of fire from cigarette butts and sparks in the area. Before laying the crown, you need to wrap the columns with waterproofing in the form of a two-layer roofing material.

- The base is assembled from two transverse and three longitudinal bars (no more than 15x10 cm in size). The beam must be laid out according to the drawing with the wide side down, fixing it to the columns with metal stitching. Next, they proceed to the design of the lower strapping, fixing the bars along the perimeter of the entire structure, the size of which should be 10x10 cm.After the strapping is made, a protrusion with a thickness of 50 mm should form at the edges inside the base.

- Install logs on the floor. To do this, you need a bar with a section of 5x10 cm, it is laid with the edge down on three longitudinal beams placed on the crown. Fastening is carried out by inserting a beam into the slots of the lower harness. In this case, an interval of 60 cm should be observed. The gaps formed along the perimeter between the columns should be covered with heavy material, and the distance between the sand and the logs should be covered with expanded clay. Then the installation of corner posts from 10x10 cm beams is carried out.

- Make the top harness. It is carried out using a 10x10 cm beam. The rear and end beams must be fixed so as to match the level of the rear struts. As for the front beam, it is positioned slightly higher, respecting the border with the front struts.

- Install the roof. To cover the structure, you need to install and securely fix wooden rafters at the very beginning. Then carry out the installation of the racks and the roof sheathing.

The construction is completed with the installation of doors, windows and the decor of the change house, both outside and inside.
Summing up, we can say that making a change house yourself is not difficult at all, you just need to have a little knowledge, experience and be patient.

Layout inside
A change house of 3 by 6 size may not contain any partitions in its layout, or it may be two or three rooms. There are also projects in which a toilet, shower or bath is additionally attached to the change house. Indoor partitions also help separate the living room from the kitchen.
Among the many projects for the construction of a change house 3 by 6, those in which the presence of 3 rooms is provided are very popular. The main room is allocated an area of 3x4.5 m, it is equipped with all conveniences, a heating system and decorated. The second room will be a corridor, its size will be 1.5x1.5 m. The corridor will protect the living space from the cold. The third room will be a toilet or storage room measuring 1.5x1.5 m.

Recommendations
The construction of a change house 3x6 m is considered painstaking work, but you can easily cope with it yourself, without resorting to the help of specialists. This will help significantly save the cost of installing the structure. If the change house is made by hand for the first time, it will be useful to consider the following tips:
- before the interior decoration of the walls and ceiling, the location of electrical appliances should be determined, since the wiring must be carried out in plastic or metal sleeves;
- before attaching too heavy objects to the walls, an additional crossbar should be installed;
- you can equip a shower or a bathroom only with moisture-resistant materials, and installing a dry closet would also be a good option;
- in order for the change house to be used in winter, it will be necessary to install a heating system, and also during construction, lay thermal insulation materials on the walls, roof and floor.


How to make a 6x3 change house with your own hands, see the next video.