
If there is an ineradicable desire to assemble a compact off-road all-terrain vehicle, it is preferable to design a car from domestic vehicles. Better than others are classic car models, namely, the VAZ brand. The parts in these cars are actually ideal for building a small buggy.


Tools and materials
The buggy is a great vehicle. Riding a compact SUV, you can easily overcome artificial and natural obstacles, small bodies of water, unplowed fields and get incredible driving pleasure. Another motivation to build a race car is a job that every master can do. Any motivated motorist will be able to make a single or double buggy without assistance.
If you are worried about the positioning of an auto electrician, it is logical to take a donor car, running on a carburetor, and place the power unit behind, behind the driver's seat. Use hubs, front axle shafts for rear drive. Fasten the trunnions on the rear axle tightly, and the front ones - like in a car
... In order to uniformly transfer the moment of force to the axles, the differential must be blocked.


For off-road driving, you need to collect a tourist version of the buggy, not a sports one. You should also adhere to the basic proportions: dimensions, weight and other technical conditions. In general, it is desirable that the machine is not too heavy, about 300 kg. To comply with all the necessary parameters, the wizard will need a drawing, which he will use in the process of assembling the model. In order to simplify the design of the circuit, one of the special computer programs designed for simulation can be used. Also, in addition to the donor's car, you need to prepare the necessary tools and additional materials, fasteners:
- pipe bender;
- welding machine;
- electric drill;
- set of tools;
- bolts, nuts, washers;
- pipes;
- measuring tool;
- pencil;
- file.
The list may be incomplete, because for each buggy model certain tools and details are used.


Manufacturing process
The first duty is to make a homemade frame. To this end, pipes should be cut to size, according to the drawing, and a simple structure should be made using a welding machine. For a compact buggy, it can take approximately 40-50 meters of pipe. In general, when designing a small all-terrain vehicle with your own hands, you need to take into account the height and weight of the person who will operate the car. If you plan to create a 2-seater buggy, therefore, you will have to take into account the dimensions of the passenger.
Since the rear and front suspension consists of the same levers, a special "pedestal" can be welded to help simplify and clarify the assembly process. At this stage, a pipe was used, 18 silent blocks from the VAZ car of the nine, and the shaft was taken from the sixth model. The wheels are also taken from the classic brand and at the preliminary stage are tried on to the axles.
The silhouette of a buggy should appear - a metal frame with wheels installed.


Remove the rotary cams for the buggy from VAZ from the sixth model, and take the steering rack from a foreign car - Daewoo Nexia. But if the part could not be found, it is advisable to try to mount an auto part from a front-wheel drive VAZ. There may be problems with the steering rack.
If it doesn't fit, the body can be shortened and symmetrical holes drilled for the steering ends. For the buggy to handle well off-road, the ends of the shaft must be equal to the beginning of the suspension arm. To maintain the steering geometry, the Ackermann angle must be maintained.
It is better to take shock-absorbing devices for the front suspension from the VAZ 2106. The nodes from the tenth model are more suitable for the rear. They have the required stroke and are endowed with sufficient rigidity. Four-wheel drive is not recommended due to the complexity of the design. We'll have to revise the drawings, refine them, make adjustments.

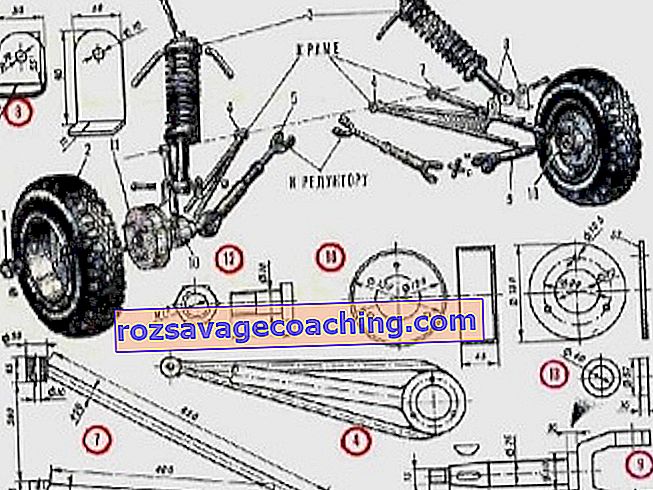
For a regular buggy, it will be enough to install a brake system in the back of the car. Calipers and knuckles from the ninth model, and the brake cylinder from the sixth. Bring the brake hose through the tee to the rear calipers, and plug the front circuit for no need.
In order to achieve the required power, it is advisable to assemble the buggies with an engine from the Oka, and take the "mechanics" from the Moskvich 2141 . In this version, the clutch is better supplied from a VAZ 2106, because the input shaft of a Muscovite's manual transmission ideally fits with such a clutch, and also withstands significant loads. At this point, it may be difficult to pair the clutch disc. In this case, the input shaft must be lengthened to the required size. You will also have to slightly modify the bushing, the ball bearing clamping fork.
Now you need to decide how to start the engine. Here you can make a hole in the bell, and put a gear starter, which was installed earlier on the basis of the classics. For the drive, it is logical to use - an external drive from VAZ, and an internal one from "Moskvich". Next, you should install it on the ICE frame and think over the option of installing the mechanism and the gearshift knob. Here you can take details from the VAZ nine. One of the last steps is the installation of the ignition, cooling system and other missing equipment - temperature sensors, speedometer, battery.


Recommendations
Before assembling the buggy, in addition to the donor car, auto parts from other cars will be required, so this issue needs to be carefully worked out. It is also advisable to purchase materials with a margin. It is better to assemble a small SUV in a garage, where there is lighting, electricity, so that you can always connect an electric drill, a welding machine.
If the buggy is going to be designed by a novice motorist, such a person is recommended to seek help from an experienced car owner or auto mechanic.
How to make a buggy from a VAZ with your own hands, see the next video.