
They try to arrange the garage very carefully. But if enough attention is paid to its strength, protection from attacks, moisture and temperature extremes, then the lighting device is often underestimated. At the same time, the usability of both the room as a whole and individual zones depends very much on the quality of the backlight.


Features:
In the garage, cars are not only stored, they are sometimes repaired there. It is very inconvenient and time-consuming to take it out every time, which is why many motorists equip special observation pits. But even on a bright sunny day, when the doors are fully open, the flow of light in this part of the room is insufficient for work. The lighting in the garage must be thought out also so that even in the most remote corners everything is clearly visible. Almost everyone will be able to prepare and mount the necessary devices.


Varieties of lamps
First of all, you should decide on the type of lamps you need. Traditional incandescent lamps should not be used, if only because their efficiency is low, and too much heat is generated during operation. In addition, the emission spectrum of old lamps is represented by yellow and red tones, which distract from work. And the risk of fire when the incandescent lamp burns out is very high.

Halogen bulbs are fairly close to incandescent bulbs , but the bulb is filled with bromine vapor. Thanks to them, the tungsten filaments are heated more efficiently, give a higher luminous flux and can work up to 4 thousand hours. Fluorescent lamps are bulbs in which the electrodes are surrounded by inert gases. The inner surface is covered with phosphors that glow under ultraviolet radiation. It is recommended to select light sources that meet the IP-65 protection class, they are very resistant to dust and dirt.

LED lighting is very popular and is considered by many to be a real breakthrough in lighting technology. Such devices are quite expensive, but provided they are of high quality, they can work 50 thousand hours. Compared to fluorescent lamps, LEDs consume less current and produce more attractive light. Diode lighting is versatile, fluorescent lighting is more efficient in a heated room, and halogen lighting in a cold one.

It is necessary to use LED-based floodlights to illuminate individual parts of the room - especially when working under the car and inside inspection pits. Stand-alone lighting is also best accomplished with LEDs. It is always made on the basis of ribbons in shades (300 units per shade). The wires lead to the ceiling, switching is provided through the shield. When the garage is left without electricity, 12 volts from the battery will be provided for a while. When power is restored, the battery will start charging again.


Drivers who keep up with modern technological advances often use another device that allows them to be less dependent on interruptions in backbone networks. We are talking about a solar battery that generates electricity during the day, and at night the battery gives the received charge. The only problem is that you will either have to be in the garage all day, or pay for its solid security. After all, the number of people who want to steal batteries is very large, they are expensive.


A useful option is a motion sensor to turn on the lamps. Moving around with a heavy tool, bulky parts, or simply with dirty hands, even the most convenient switches are difficult to use. Automation allows you to successfully solve this problem.


In addition to choosing the type of luminaires and completing the lighting system, it is required to correctly calculate their power. The easiest way is to use light sources with a power of 16 - 20 W per 1 sq. m.
Also, amendments are introduced:
- for ceilings not higher than 250 cm - zero;
- in garages with a height of 3 m and more - an additional 50%;
- the darker the finishing material, the greater the luminous power of the lamps should be.


It will be easier to save on energy by making the walls, floor and ceiling as light as possible.


What's the best location?
When the types of light sources and their power are determined, it is the turn of choosing their arrangement. The basic requirement is that the light distribution is uniform throughout the garage. In most cases, the lamps are placed as they consider convenient and comfortable for themselves. The traditional scheme involves fixing the luminaires on the wall and on the ceiling, while the more modern approach involves the use of stand-alone systems. Powered by batteries, the flashlights can not only be moved to any convenient place, but also completely independent of the mains.


Lighting in the garage is recommended to be multi-level: a large lamp is placed at the top, and smaller side lamps are installed for each working area.
A typical distribution is as follows:
- the first level is the ceiling;
- the second level is at a height of 1.8 m;
- the third level (working) - at a height of 0.75 m;
- fourth level - 40 cm from the floor.


Full-fledged garage lighting is made in such a way that the shadow of the car does not fall on the lamps. The side lamps are mounted on brackets, which allows them to be turned in the required direction. Stationary light sources are positioned so that they do not blind the eyes during entry, exit and normal work. Another prerequisite for success is the use of shades. This prevents the negative effects of glare and flickering. The main lamp is placed not just on the ceiling, but where it will illuminate the hood without creating a shadow.


It is especially important to prepare lighting in the observation pit, where something can roll away at any moment. In this case, it is permissible to use only low-power light sources - LEDs and halogen lamps. After all, high humidity, which is difficult to get rid of, increases the risk of electric shock. The luminaires are placed in bottles covered with steel nets along the edges of the pit, in specially prepared niches. As a result, the lamps will not interfere with work, and will remain intact even if a heavy object or a sharp instrument falls from above.


It is best to carry out the wiring in a hidden way - but note that after plastering the walls, this will no longer be possible. Calculate everything as carefully as possible so that the finishing material is not soon destroyed. The wires are made parallel to the ceiling, and before starting work, they consult with experienced specialists. If you are unsure of your knowledge and skills, it is better to hire a qualified electrician, especially when the garage is located in a basement or other place where water accumulates.


When working independently, it is required to form a clear scheme, which will indicate:
- power supplies or external inputs;
- lamps;
- other stationary devices;
- wiring routes;
- sockets and switches.


You always need to go to the store with this scheme - so it will be easier for the sellers to figure it out, to suggest something, and there is less risk of forgetting the necessary points, confusing certain points. Distribution boxes should be installed above all sockets and switches. When the installation and connection is complete, it is advisable to immediately check the functionality of the components and switches. And if you find the slightest problems, you need to fix them immediately.

Preparation stages
In both large and small garages, open wiring will require the use of ducts (plastic or metal). A corrugated pipe can act as a replacement for boxes. When choosing an option, it is advisable to be guided by the recommendations of professional electricians. In any case, a general switch located at the entrance or entrance to the garage is a must. It allows you to immediately light up the overhead light when you enter the room, or turn it off when you leave.


For illumination in inspection pits, 12 or 36 volt lamps are needed (the choice between them is largely a matter of personal taste). The power supply of the light sources must be done using a stranded cable with a cross section of 1.5 - 2 sq. mm. It is recommended to choose lamps with a color temperature of 4000 to 5500 K. Cap type - E27 and E40.
LED devices must have standard sizes:
- SMD 5730;
- SMD 5630;
- SMD 3014;
- COB matrix.

To reduce the cost of purchasing luminaires and energy consumption, a mirror can be placed in the darkest places. By reflecting rays, it will allow you to increase the illumination in the garage at no extra cost.

Choosing a wiring diagram
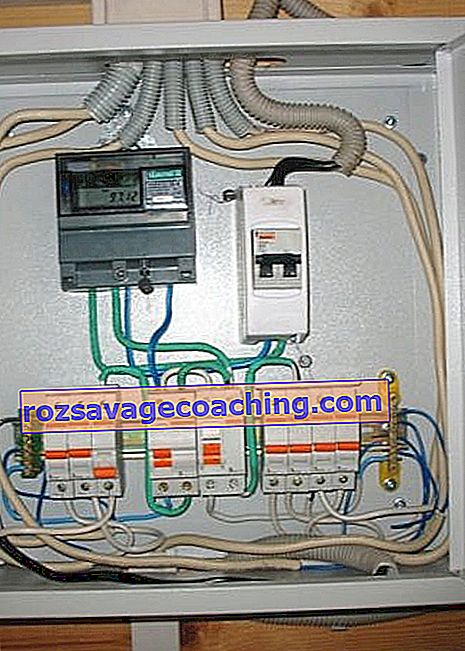
Electrical safety requirements prescribe to ground the inputs to the switchboards, and the resistance at the ground is made to a maximum of 4 ohms. Regardless of the specific organization of the power supply, an electric meter is installed in a separate garage, and if the garage is connected to a home electrical network, then it is not needed. The current of the input machine is determined by the value that is technically acceptable in the given electrical network or allowed by the board of the garage cooperative.
Also, any scheme should contain:
- residual current device;
- step-down transformers;
- detached machines for chargers and welding machines.

Lighting lines should be correctly created on the basis of VVG 3x1.5 cable. Single-phase power circuits are made from VVG 3x2.5 wire, and three-phase ones from VVG 5x2.5 wire. VVGng 3x1.5 cables are used inside PVC pipes and boxes. An open installation on top of a combustible base requires the use of a VVGng LS 3x1.5 solution, which, due to its complex insulation, makes it possible to do without reinforced protection. You can run the track both vertically and horizontally. The shortest diagonal spacer should be chosen whenever possible.


Important: turns are allowed only at an angle of 90 degrees , with a gap of at least 0.1 - 0.15 m from floors and ceilings. Do not place wires closer than 150 mm from heating pipes and other heating structures, at least periodically. Since water and dust are invariably present in garages, all electrical equipment must be protected from both factors. It is forbidden to bring switches closer to gates, jambs and windows. The minimum mounting height for the sockets is 0.6 m.


Do it yourself: instruction
Garage lighting and electrical wiring requires the use of:
- tester;
- a set of insulated screwdrivers;
- insulating tape;
- dielectric gloves;
- protective glasses;
- insulated pliers;
- a construction knife or nippers (they cut off the wire and strip it).


Laying wiring, installing switch cabinets and other components is impossible without rotary hammers, drills and wall chasers.
Also worth cooking:
- construction spatulas;
- jigsaws;
- saws for metal and wood;
- hammers, wrenches;
- drills for certain materials;
- circular saws;
- building levels and a measuring tape.


The exact list of tools is determined by what kind of work needs to be done and what is their volume. One outlet should be 6 square meters. m. garage, and the switches of the general and local level must be separated. When the room has separate areas, the number of light sources at the overall level can be reduced. But this means that you will still have to connect private power supplies to the main power lines with high quality.

Brick walls with plaster and lime plaster allow for concealed wiring. The center of the cabling is the internal distribution block. In the direction of the sockets, strobes are drawn for power cables. The strobes from the switches to the ceiling lamps must be done vertically. When a suspended or fire-hazardous ceiling is used, the lighting lines are supposed to be removed in a special corrugation, hidden by a false ceiling.

On high ceilings of a complex configuration or from strong, difficult to process materials, you need to stretch the corrugation under a canopy. When working, they carefully monitor that the cable tension is uniform: it should not stretch and break anywhere. The locations for the junction boxes are equipped with recesses.


One cannot expect that the arrangement of lighting in the garage will be cheap and of high quality at the same time. It is even more difficult to do this job in a metal building. A frame garage, insulated from the outside and finished inside with several types of materials, is equipped with lighting systems with a combined route route.
The main nuances are as follows:
- shields are placed on non-combustible bases to the right of the door or gate;
- it is advisable to place electrical lines hidden;
- if concealed installation is impossible, boxes made of plastic or metal are used;
- these boxes are attached to the walls as reliably as possible;
- open boxes are used to install sockets and switches;
- lighting fixtures are placed on special brackets, which are selected in accordance with the mounting method.


When in the garage, in addition to the car, household accessories, spare parts, tools, things, or there are a number of working segments, accumulate, several points for turning on the light should be provided, one of which will be the main one. All devices in inspection pits must be connected only through a step-down transformer. If the calculations are performed correctly and no mistakes were made in the installation of wires and equipment, the safe operation of the electrical network is guaranteed for about 30 years.

It is imperative to provide emergency garage lighting. The simplest option is a pair of LED strips that are connected directly to the batteries. It is not necessary to take a car battery, a computer uninterruptible power supply unit is also suitable for solving this problem. As an autonomous source of power supply, a wind generator can only be used in mountainous areas or on the sea coasts, where the wind speed very often exceeds 6 m / s. At this flow rate, a standard device generates 1 kW of electricity per hour - quite enough for lighting fixtures.

If the solar panel and battery are not suitable, you need to choose the "Philippine lantern". This is a transparent plastic bottle with a galvanized or stainless steel screen. The shape of the screen is either round or rectangular. Pure water is poured into the container and diluted with bleach. The device is placed in the roof, and the joints are filled with sealant or silicone. To get enough light in the room, you need to use several lamps.

Helpful hints and tips
The street lamp should be equipped with a motion sensor. Then he will not spend the whole night on the battery or wind up the counter disk. Even the smallest part of the wiring cannot be used without grounding. It is extremely dangerous to save on lamps, RCDs and cables. If it is not planned to repair the car in the garage, or it will only happen occasionally, then you can save money by abandoning emergency lighting. People who rarely visit the garage should only mount one lamp and use it as needed.

A little advice on wiring lighting in the garage, see the video below.