
Just a roof without additional elements or an unheated attic suits very few people. An excellent alternative to these two solutions is the construction of an attic. In order for it to fully fulfill its functions, it is also required to perform the roof using a special technology.

Distinctive features
All mansard roofs have one important feature - the retaining walls, which are noticeably higher than in the case of a cold attic. The slope, which is clearly divided into gentle and relatively steep, must be done as carefully as possible. It makes sense even to invite professionals, because, as practice shows, saving on their services is irrational and leads only to harmful consequences. The work can still be done independently, but the preparation of the attic project is much more difficult than in the case of a conventional roof.


A waterproofing layer must be equipped to prevent moisture penetration into the room. The outer coating is always created only from materials that are both lightweight and strong. From the inside, finishing is carried out for the most part with the help of gypsum plasterboard and materials based on it. The supporting structures are made exclusively of wood or metal. From insulation to roofing, an empty space is required for maximum ventilation.


In contrast to a simple attic, the attic is always equipped with convective forced ventilation. Thanks to it, stagnant air rises to the ridge of the roof and leaves it through the aerators. At the same time, fresh air flows pass inside with the help of cornice vents. Continuous circulation helps maintain a pleasant microclimate. Problems with excessive humidity and stuffiness completely disappear.


Varieties
The mansard roof is available in different formats. A sloping roof is equipped on all slopes with a pair of pitched planes, one of them is flat, and the other is with a large slope. The first plane tilts 20-30 degrees, the lower one 60-80 degrees. This solution is recommended for private houses with a maximum width of 6 m. Difficulties when working with a sloping roof are justified by the appearance of a full-fledged upper floor, the rafters are supported by racks, the lower belt is the base for the floors.


A semi-hip roof is a solution that relies on the Mauerlat through a symmetrical rafter system. Miniature slopes are made over the gables. A gable roof is always more difficult than a gable, especially in terms of the construction of rafters. Skylights in hip roofs are often placed in the same plane as the roofing pie. But if the windows are not closed tightly enough, the attic will be flooded with rain and melt water.


The Danish format differs from the simple hip format by the presence of gables that improve the lighting of the attic through vertical openings. The rafters of hip roofs do not have break points, they go straight. The upper end of the corner ribs rests on the ridge, the length of which is determined by the characteristics of the rafters. Gentle sloping roofs are also sometimes broken. The hip roof is close to the hip roof, except for the moment that a ridge is not placed in it.


The multi-pinched type is performed as a combination of several gable blocks. A feature of this type is a sophisticated geometry with a mass of kinks. And also a vault, dome, cone and some other structures can be created, but these are already more complex options, therefore only qualified specialists should perform such work. Aesthetic qualities and external uniqueness make it possible to realize the most complex ideas. A semi-skylight roof is equipped in cases where it is very important to use the space as fully as possible and perform vertical glazing on the floor.


Shape selection
The gable format is the easiest to work with and saves the materials used. But you have to "pay" for everything - and in this case, the "payment" is a decrease in the available usable area. In addition, you will have to build walls at an angle, which will prevent you from putting tall furniture and interior items inside. For a separate bedroom, this option is optimal, and if you need to create another room, then it is better to choose some other arrangement scheme.


Among consumers, sloping roofs are most in demand , under which it is easiest to create a high-quality living area. By eliminating the windows protruding from the slopes, it is possible to simplify the technology, but this will increase the cost of materials. If in the first place such considerations as obtaining an unusual type of verkhotury and the most intense precipitation fall, then it is worth choosing the multi-pinch option. It is distinguished by its impressive resistance to mechanical stress. In case of any difficulties, you should additionally consult with specialists for a particular house.


A single-pitched roof is not very suitable for arranging an attic, because it can be equipped with a large slope only by strengthening the rafters and increasing the cost of roofing. Hip and half-hip (sometimes also called Danish) formats make it possible to build a spacious room with an acceptable ceiling height. But in this case, it is more difficult to build rafters than when using one ramp, and the total cost of work is tangible for almost all customers.


Taking into account the additional layers in the roof, it turns out that from the floor to the ridge of the roof there should be at least 250 cm.For the construction of a two-level attic, more than 5 m will have to be reserved from floor to ceiling. window. Having placed them in the plane of the roof, you will have to take care of the finishing in order to prevent precipitation from getting inside.


Rafter system
What are they?
Under the attic, you can build a rafter complex of one of three main types, namely:
- layered;
- suspension;
- combined.
The suspended rafter system, based only on the girders of the skates and the Mauerlat, is laid using the upper and lower ties. On slopes exceeding 400 cm in length, the lower parts of the rafter legs must be reinforced with uprights or struts to prevent sagging. The advantage of the overhead option is that it is all located in areas not used by people, and allows you to provide a lot of free space.


Reinforced frameworks are formed in cases where heavy roofing material is located at the top. Regardless of the type of execution, the ceiling height in residential attics cannot be less than 230 cm. The inlaid view is ideal if there is a load-bearing partition in the middle of the house. The load from the structure is evenly spread over it and along the outer walls. It is easy and convenient to organize the frame in this way, but at the same time there should be a maximum of 700 cm from the outer walls to the inner one. The suspended version is useful if the building does not have both load-bearing partitions and columns, so it will not be possible to transfer pressure from the roof to them. The reference points in this case are the ridge run and the Mauerlat.


If the roof is small (area not higher than 50 m²), you can build rafters according to the simplest scheme. It includes "legs" and a puff oriented horizontally. When the building is large, you will have to use stances and struts to strengthen the fight, but strengthening turns into a decrease in the usable available area. You cannot use the elementary type if from one wall of the structure to another more than 14 m. But when the roof support in the middle will be carried out not by a partition, but by columns, then mixed rafters are used.


The bottom line is simple: some of the rafters transfer the mechanical load to the columns, other elements are carried out in a hanging form. The advantage of this step is obvious, it reduces the need for additional details and does not put undue pressure on the foundation of the house. In any case, the arrangement of the attic and its type are thought out at the time of design, since the characteristics of the walls, foundation, rafters and roof are closely interrelated. The decision to remodel a finished house or to supplement an ordinary house with an attic means the need to rework all the calculations and schemes. It is especially difficult to work on difficult soils, where groundwater is high.


Payment
Mansard rafters for the period of operation must completely (with a margin) carry the load:
- their own mass;
- roof pie;
- the largest possible gusts of wind;
- average annual load from snow and ice;
- peak loads from precipitation.

If the roof is very steep (more than 60 degrees), the pressure from snow and rain can be safely ignored . But on the other hand, the impact of winds, even relatively weak ones, increases significantly. In the calculations, a couple of parameters are taken into account: the cross-section of the rafters together with the beams, they are also called puffs, and the distance when installing them. Do not assume that the size of the wooden beams increases with increasing loads on them. The greatest rigidity of structures is achieved when using logs with a diameter of 12–20 cm or when taking sawn timber with a cross section of 4–20 cm, while the installation step is 50–120 cm.


Without special engineering knowledge and information about building a house, it will not be possible to calculate the construction more accurately. Online calculators are unable to provide anything other than preliminary estimates. Calculations made with their help will need to be checked additionally. It is not necessary to consult with experts, but you can simply focus on the ready-made numbers. Let the snow load on the flat projection of the slope be 100 kg per 1 m², its slope is 60 degrees, and the span length is 450 cm (up to the struts), and the rafters are spaced at intervals of 1.2 m.


For example, the front covering is represented by slate. The actual mass of the snow load is 100x0.25 (0.25 is the slope coefficient). The specific gravity of slate with a typical profile = 25 kg per 1 m², and the total specific gravity is 50 kg per square meter. To convert the specific weights to running meters of rafters, you need to multiply the resulting indicator by the installation step. Then the cross-section of the rafters is selected according to the lengths of the spans; but it is important to consider that ready-made schemes are suitable only for relatively simple options, and if the roof is large or complex, then you will have to turn to professionals.


The correct calculation of the roof must take into account not only the load that it creates itself , but also the pressure from the wind, from the snow mass (the average maximum value is taken according to long-term observations in a particular area). The tree for the rafters is selected so that there are a maximum of three shallow knots per 1 running meter, the size of which is no more than 3 cm along the longest edge. The wood should not have a single through crack, and the highest permissible moisture content can be 18%.

Erection of the structure and laying of the "pie"
Frame: device
Drawing up a competent project and calculating the exact dimensions of the elements in it is only half the battle. It is also necessary to be able to implement what has been planned as it should. The work on the construction of the frame using a simplified method allows you to make a sloping mansard roof in two stages. First, the trusses of the rafters are assembled on the ground, then they are laid on the prepared walls. For assembly, boards with a section of 150x50 and 100x50 mm are needed, their length is exactly 600 cm.


To build a frame of rafters with your own hands, you need to do the following:
- prepare beams for the lower chord of the truss, taking into account overhangs of 250-270 mm on all sides;
- if the length of the timber is insufficient, increase it by nailing a lining of a suitable section with nails;
- attach to the beam laid out on the ground, vertical posts that form the walls of the future attic;
- fix the ceiling beams and ridge supports;
- supplement them and the corners of the structure with a pair of boards for marking under the hanging rafters;
- cut the elements in exact accordance with the place and attach them;
- from the remains of lumber in the same way, build the lower legs of the rafters and nail them to the frame;
- repeat all the same steps when installing the remaining trusses.


The front gables are in most cases equipped with windows or doors leading to balconies. To simplify the work, it is advisable to build all belts and racks on the ground. Having received the necessary frames, they are raised one by one and sequentially, moving from the first pediment, are fixed in place. Avoiding the fall of the pediment is easy - you just need to put spacers and attach them firmly to the walls. The arrangement of all the following trusses should be exactly as shown in the drawing.


The exposed rafters are attached to the walls by screwing the brackets into the second highest crown or using steel corners and self-tapping screws with a zinc layer. If the walls are made of bricks or other capital blocks, the connection of the rafters is achieved by the Mauerlat. A wooden beam, placed around the entire perimeter, is attached to studs or anchor bolts. To separate such a structure from the stone surface should be waterproofing (layer of roofing material). On this, the work with the rafters themselves can be considered complete.
Waterproofing
To ensure the safety of the roof for many years to come, it is very important to put a number of layers of materials that provide reliable cover from negative factors.
Be sure to use diffusion membranes, which simultaneously perform the following functions:
- do not let the wind pass;
- block the penetration of precipitation;
- water vapor is freely conducted outside.

The first of the canvases is rolled out in the lower segment of the roof; you need to attach it to the boards with a construction stapler. When installing all subsequent canvases, an overlap of 0.1–0.15 m is provided. When the entire base is closed, you can fill the crate. The final coating is then laid. The installation, the technological nuances of the work depends on what it will be.
Instead of simple waterproofing, it is best to use materials in the attic with minimal condensation. They help to avoid getting the insulation layer wet. The best option for such a coating is considered to be films made of polymeric materials without perforation. Whichever type is used, a 50 mm ventilation gap is allocated for it in the cake. With the help of rolls of polyethylene with an outer aluminum layer, it is possible to simultaneously guarantee the retention of heat in the attic.


Reinforced polypropylene is invariably better than polyethylene because it is stronger and immune to ultraviolet radiation. One face of such a film has anti-condensation properties; it is made from a mixture of cellulose and viscose. As a result of laboratory tests, it was possible to prove that anti-condensation coatings take in a lot of water and keep it inside without the formation of drops. It is worth changing the conditions that created the condensation, so the material dries out pretty quickly. Of course, you should carefully choose which side to put out.


At sharp angles of inclination of the roof, waterproofing is reliably provided by windproof or vapor barrier membranes. If the slopes are relatively flat, then be sure to use a film that protects against condensation. Diffusion membranes are mandatory in roofs with one air outlet: two or more ventilation gaps usually make it possible to do with simple materials. Moisture-proof films over living quarters are laid in two layers. Prior to installation, they should be stored in a dark, stable space, away from heaters and incandescent lamps.

Warming
The insulation is laid out from the inside with a layer of at least 200 mm. With such a thickness, the level of thermal insulation will be sufficient and guarantees prevention from both winter hypothermia and summer overheating. If the layer of thermal protection is too small, the snow will be heated. Continuous melting and hardening will quickly render even the most reliable roofing materials unusable. If the attic is not protected from above, you will have to use powerful air conditioners on hot summer days.


According to professionals, it is possible to properly insulate the attic roof using foam glass, mineral wool or expanded polystyrene. Foam materials do not absorb water, and plastics are more flammable than cotton wool insulation. If you use extruded polystyrene, you can provide decent sound insulation at the same time. By using foamed glass, you can insure yourself against fire, frost, rotting under the influence of high humidity. The advantage of cotton wool is its affordable cost and ease of use; its basalt variety stands out for its increased strength.


Insulating materials are fixed using lathing. It is formed on the basis of planks. The width of a single block is 100–150 mm, and its thickness is 50 mm. Choosing a heat protection that is impervious to moisture, you can sometimes refuse vapor barrier. But experienced experts believe that such a step is rash in any case. After all, it is not known how the conditions inside the roofing cake will change over time, how severe weather disasters it will withstand.

So that cold bridges do not form in the attic, intended for winter living, in addition to the main layer of protection, it is necessary to provide for another one - it surrounds the rafters and their legs. Of course, the rafters are no longer visible visually, and you need to immediately note where exactly they pass. Otherwise, the subsequent fixing of materials and structural elements will be a very difficult matter bordering on an adventure. A water vapor permeable film is always placed above the thermal insulation. The calculation of the need for materials for insulation is based on data on the internal volume of the room, but a margin should also be provided so that overruns in case of marriage in work and for other reasons do not affect the result.

Ecowool can also be used as a heater. Its advantages are obvious, but all work must be carried out by strictly trained teams with special equipment. There is nothing to think about self-installation of such an insulating layer. The disadvantage of the ecological variety of cotton wool is its composition. Due to the presence of cellulose flakes, the material is highly flammable. Penofol is used as an enhancer of the effect of other thermal protection options, but by itself it is extremely rare.

Additional elements: installation
Even when the top covering is laid on the roof, this does not mean that all the work is completed.
It is required to mount additional elements that perform a fairly diverse function:
- make the edges of the slopes more orderly in appearance;
- cover the inner and outer ribs;
- isolate the cake from seepage of precipitation, dust particles and various insects, small birds.


When installing corrugated board, different additional parts are used. Almost all of them have to be mounted at the last stage of work on the roof, but certain types must be installed before laying the sheets. All these details should be studied in advance so as not to destroy the already prepared structures and not to recycle them from scratch. Drippers are supposed to be attached to the rafters along the line of the lower eaves strip, and before filling the sheathing. Such elements are mandatory in low-rise buildings that are not equipped with drainage systems.
Endows or gutters are concave corners of joining slope planes. It is in these places that roof leaks occur most often, so they need to be given increased attention when working. The bottom of the valley is placed before the profile is laid out on continuous battens made of boards. The width of the battens should be 0.6 m on both sides. The top planks are shaped like a simple corner with the same cross-section as the bottom part. They are laid out after the profiled sheet is laid and attached.


If the roof is sloping, the valleys are supposed to be covered with mastic, and on steeper structures under the steel corners, a waterproofing strip is placed. The width of this strip is 0.2 m greater than the width of the part being put, and the exit on the right and left should be the same - 100 mm each. The abutment bar, around the perimeter of the brick chimney base, is placed in about the same way as the valley, it is divided into two parts. The lower planks should be underlain by a waterproofing carpet. The upper edges are inserted into the shafts, the depth of which is approximately 15 mm.
The lower rims of the chimneys are glued with a sealant, then a coating is placed , and when the corrugated board is laid, the cake is covered with the upper rim. Wall connections can be made without double-layer metal protection. The lower bar is simply replaced with glued waterproofing, which is placed along the docking line. To decorate a significant area, it is required to lay strips with an overlap of 0.1 m. Additional elements are fixed above the corrugated board in two planes.


The roof is attached with self-tapping screws 0.19x0.48 cm in size, they are placed in increments of 0.4 m. Cornice strips are installed only after the installation of structures that hold the gutters. This requirement does not apply when using short brackets. If the slats have not yet been installed, the end is protected with ventilation tapes or mosquito nets. The end strips for the corrugated board are attached to the boards at the ends, the high edges of these elements are displayed above the slope at exactly the same mark as the profiles.
On a gable roof with slopes in the shape of a rectangle, pieces of wood are nailed to the ends before the main covering is mounted. Their role is to form a kind of border around the entire perimeter, it will make the layout of the sheets more accurate. End extensions, representing an angle with unequal width of the shelves, are mounted with overlapping of one of the shelves of the final wave of the sheet. The ribbed version is equipped with another rib oriented along the fold line. This design simultaneously increases the strength and aesthetic characteristics of the parts.

The ridge strip is invariably used on any sloped roof. It not only overlaps the "top" of the roof mechanically, but also completes the visual image of the structure as a whole. Ridge strips are installed after placing a ventilated seal along the entire installation line, duplicating the roof relief in this place. The lathing is placed solid, covered with reinforced waterproofing. The ridge strips are pinned to the convex corrugations with self-tapping screws; the step of the fasteners can be up to 300 mm.
Regardless of the type, snow guards are placed only on a continuous crate. When the attic is built in the form of several steps, it is necessary to hold back the falling snow for each of them separately. The same structures are placed under the entrance groups and under the windows. Fenders stopping the snow mass must be placed 350–500 mm from the edges of the overhangs, in a straight line or according to the checkerboard pattern. Attachment is provided by self-tapping screws with washers that increase the density.


A different approach is practiced on a tile roof. There, extrusions are made of clay; moreover, their list is significantly different. There are skates of bizarre configurations that resemble a lily or even an eagle. There are units for ventilation systems. Non-standard sections are sheathed with elements in the shape of the letters Y, T, X. And also nozzles, ribbed grooves, roofing umbrellas made of various types of metal are used.


When working on a seam roof, in addition to installing the valley, you need to pay special attention to the ridge knot and the points of contact. Since folded structures can pick up static electricity, it is unacceptable to use them without lightning rods. The choice of accessories for hip and semi-hip roofs is determined by the type of construction material used. Maximum effort should be spent on retaining snow and ensuring a full-fledged water flow. Drains and skates must be equipped with special plugs.


Beautiful examples
When creating mansard roofs for private houses, attention is paid not only to their technical characteristics, but also to their external appeal. The photo shows a graceful mansard roof covered with red tiles. Its construction was clearly not an easy task - which is worth at least all the geometric kinks. But the result, especially when complemented by a complex window design, is clearly worth the effort.


The semi-hinged roof, shining in the rays of the sun due to the metal coating, looks very good. The four-slope structure cannot be considered simple, but it was possible to make a high attic with windows extended upwards. Some customers prefer options with a balcony, and experienced builders know how to satisfy this request. This is how a frame country house may look like, from the attic of which an exit to a covered area is open. The external fence, made of curly wooden elements, not only provides complete safety, but also gives the building as a whole additional charm.


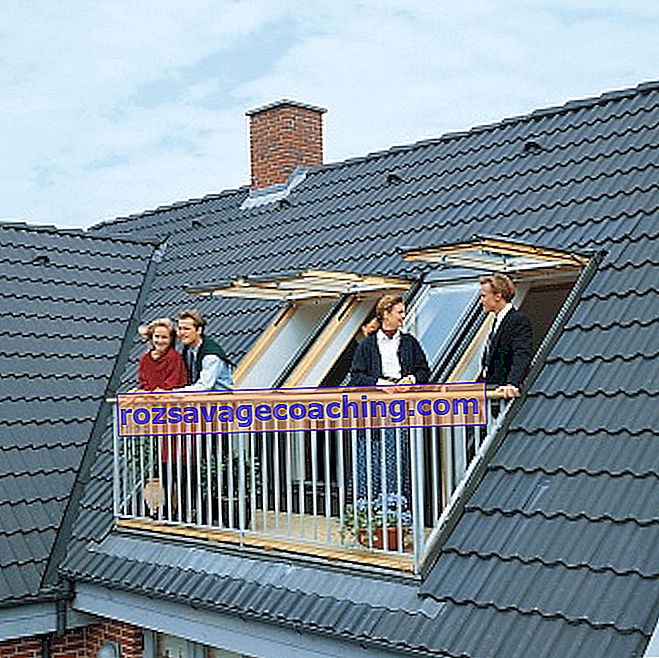
Here is an alternative solution: the balcony is equipped not at the end of the roof, but in its long plane. Thanks to this, it was possible to make the structure oblong at the cost of reducing the width. The exit to the outside is provided not by the doors, but by the rising sashes of the windows. But a balcony-type window successfully fulfills its function even with a noticeably smaller area. The photo shows one of these systems, in which metal railings are used on the sides, and high-strength glass is placed in the frontal plane.

A full hip roof can have a very fancy geometric shape. This is not only a lot of slopes, but also curved curved surfaces. The high complexity of the work and its high cost are justified by good compatibility with decorative wall elements and interesting design effects. If there is no desire to go for some radical delights, you can simply choose a gable design and implement it as soundly as possible. This can be done with a calm geometry, while creating quite comfortable conditions for those living in the attic.


For the device of the attic roof, see the following video.