
Sharpening the claws for a cat is a natural instinct: in this way, a furry predator cleans them of the stratum corneum and marks the territory. If street dwellers, as a rule, use trees for this purpose, then for pets the function of a "sharpener" is forced to perform the upholstery of armchairs and sofas, wallpaper, carpets and other home furnishings. Instead of scolding your pet for spoiled scratched things, you just need to buy a scratching post for him, or even better - do it yourself, saving a significant amount of money.
In the article, we will tell you in detail how to make different models of this feline accessory from the materials at hand.


Pros and cons of homemade scratching posts
Probably the main disadvantage of a do-it-yourself scratching post is the time you have to spend on creating it. You may also need to purchase some materials and tools if they are not found in the house. But in return you will receive an environmentally friendly and most suitable household item for your pet. And, of course, you will save your family budget.
Scratching posts in pet stores - even the most primitive in design - are not cheap. In addition, the purchased "sharpener" may not like the four-legged pet and he simply will not use it. For example, a cat may repel the smell of a store accessory, especially if synthetic dyes were used in its production. The result is wasted money and the remaining problem of damage to furniture and walls.
Knowing the tastes of your pet, you can take them into account as much as possible when making your own scratching post.


Some owners want to save money by buying used cat attributes. However, this is even worse. First, they will smell like other animals, which increases the chances of your pet rejecting the rags. And, secondly, it is not known how healthy the former users of the scratching post were (their owners may not say about this), which means that there is a risk of infection of a fluffy family member.
Another plus of a homemade scratch, especially for creative people, is the opportunity to show imagination and choose or come up with an accessory design yourself, taking into account, of course, the taste preferences of the four-legged pet. You can, for example, be creative and make a scratching post in the shape of a cat, fish or other animate and inanimate objects.
Such an accessory will not only delight your pet with the opportunity to comfortably and with pleasure "make a manicure", but will also become an original decoration of the room.


Choice of size and shape
Regarding the size of the scratching post, there are certain standards in this regard: the larger the pet, the larger the rag should be. The parameters of the product directly depend on the dimensions of the cat. This is especially important for wall models, so that, sharpening its claws, the cat does not scratch the wallpaper. The width of the claw in this case should be equal to the width of the extended legs of the animal. You can calculate the length of the scratching post if you add 5-10 cm to the length of the cat itself (excluding the tail).
For Maine Coons, the height of the vertical claw bar should not exceed 100 cm, especially if there is a bed at the top. This is necessary in order to relieve excess load from the front legs when jumping. For a kitten, make a scratching post "for growth", focusing on its approximate future size in adulthood.
If the living space allows, then it is better to supplement the claw sharpener with a stove bench and a house, one or more.


The variety of scratching post models is simply amazing. There are 2 main types of scratchers: floor and wall (or mounted). There are many variations within each species. So, floor scratching posts can be flat (located horizontally or at an angle), in the form of a column, equipped with additional beds, stairs, bridges and houses. The more cats there are in the house, the more elements the claw frame should consist of.
And almost all structures can really be done by hand from improvised means. The main thing is your desire and willingness to spend a certain amount of time with your pet.

Required materials and tools
A cat's sense of smell is much finer and more sensitive than a human. Therefore, in the manufacture of such an important and necessary attribute of a cat's life as a scratching post, you need to use only natural materials that do not have a pronounced smell. So, perfect:
- wood;
- jute, linen or sisal ropes;
- twine;
- sackcloth;
- hemp;
- pressed or corrugated cardboard;
- carpet.


But artificial materials can cause allergies and cause serious harm to the health of the cat. For example, you shouldn't make a scratching post out of a plastic pipe - plastic has an unpleasant odor and is allergic.
Another important advantage of products made from natural fibers is that they are good at removing static electricity.
The surface of the scratching post should be roughened and strong, but not too hard. The process of scratching should give the cat pleasure and relax it, and not bring unpleasant, and even more painful, sensations to the animal and cause broken claws. Cat claws should penetrate several millimeters deep into the tissue, tearing the fibers of which it is composed, but not clinging to them. From this point of view, the best solution is a sisal rope.


Try not to use nails and metal staples to connect the parts of the claw, or fix them tightly and thoroughly so that your pet does not get hurt when cleaning the claws. It is advisable to place the fastening parts on the seamy side of the product.
The material for the scratching post also depends on the size of the animal. If the cat is small, then it is better to give preference to models made of cardboard or corrugated cardboard - if the coating is too hard, the baby can damage his claws. However, large representatives of the cat family have stronger and harder claws, so it is worth making a cloth for them from stronger and more durable materials. For a large cat, natural wood is suitable.
Only it is better to choose a tree that is not very smelling and without knots, having previously cleaned it from the bark.


And, of course, be guided by your cat's tastes. See what your pet is sharpening its claws about right now. Try to use the same or similar material when making a homemade scratch. If he prefers doors, a piece of wood will do. If "does a manicure" about carpets, then carpet will be the best choice; scratches the upholstery of furniture - choose jute or sisal rope for covering (the latter is the most reliable and durable material, albeit the most expensive).


To create a scratching post, you may need the following tools:
- threads;
- glue;
- Scotch;
- compass;
- screws;
- stapler;
- stationery knife;
- drill;
- hammer and others.
Each model will have its own set of tools.


 9 pictures
 Next, we will consider the algorithms for making different versions of cat sharpeners.
How to make a suspended model?
Wall (or hanging) scratching posts have many advantages over floor ones.
- They are stable, there is no risk that a played cat will be able to turn such a sharpener, since it is tightly fixed in a certain place in the house. The wall claw rake is perfect for active, playful and large pets.
- It does not take up much space, so this type is the best solution for small apartments.
- Due to the vertical arrangement of the hanging claws, hair will not collect on them.
- They can cover the wallpaper on the wall that has already been scratched by your pet - this is another important plus of wall models.
- And finally, such a scratching post is the easiest to make at home.

We will tell you a detailed algorithm for its manufacture.
- As the base of the scratching post, we need a rectangular piece of plywood or wood panel. The optimal width is 40-45 cm so that the cat does not touch the wallpaper by stretching its legs to the sides. In length, the scratching post should slightly exceed the size of the cat itself in the position of the legs extended upward.
- The prepared wooden base needs to be covered with a material on which the cat will sharpen its claws. For this purpose, carpet is suitable, with the wrong side out (it is better to make it two-layer for the greatest strength and durability). You can also use a cotton blanket folded in several layers, or even thick corduroy. The size of the fabric cloth should be slightly larger than the parameters of the wooden rectangle in order to wrap the edges of the material from the wrong side and fix it with glue or with a stapler. Another option for covering is to wrap a piece of plywood with jute rope or twine.
- We drill several holes on the wall with a drill and fasten the scratching post with 4 slats and 6 long screws.


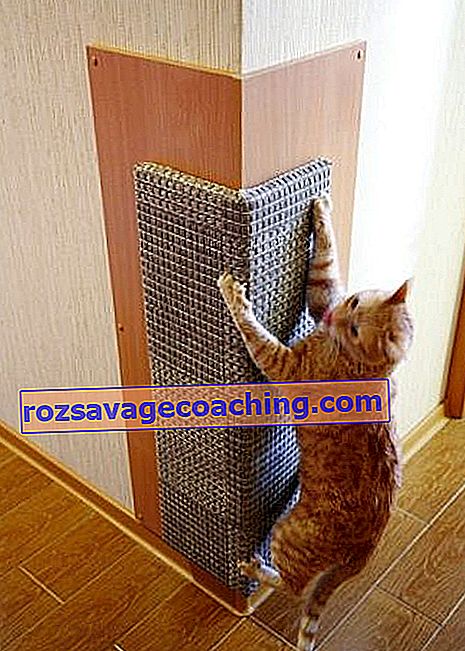
You can also make an angled scratching post, which cats love very much. To do this, you need to take not one, but two pieces of plywood, the width of each of which should be at least 25 cm. We glue a fabric layer on both wooden sheets and fix the structure with screws on one of the protruding corners of the room or on the vertical plane of the doorway.
However, if you do not want to spend a lot of time on making a full-fledged hanging claw-frame, then you can simply glue the walls to any height with carpet.


Step-by-step instructions for making a floor scratching post.
The main advantage of the floor scratching post is its mobility - the ability to quickly change the location of this feline attribute in the apartment at your discretion.
There are a huge number of models of floor scratching posts, including those that you can make yourself. Let's talk about the main options that are easiest to make with your own hands.
The simplest and fastest model to make is a regular horizontal scratching post, which can also play the role of a cat's bed.
Take a sheet of plywood or a regular board. On both sides, we glue it with a carpet with the wrong side out, also the edges of the material can be sewn with thick threads or fixed with a stapler. That's it, our scratching post, it’s a bed, is ready.


And here is a slightly more complex version of the horizontal rag.
We nail a block of the same size to a rectangular wooden plank 30 * 60 from both edges (you can screw them with screws using a drill). Only they must be fixed securely so that the cat is not injured by iron parts.
Next, we wrap the wooden board with rope (jute, sisal or twine), having previously greased it with glue.
You can additionally fix the cover if you drill two holes in the board next to the bars and thread ropes through them, making knots at the ends.


You can make not a horizontal scratching post, but at an angle (in the form of a slide).
- To do this, we need another wooden plank, the same or slightly shorter than the main one (the angle of inclination of the future product depends on this).
- We cover both boards with a carpet or other tough dense fabric. We fix the canvas with glue, you can also sew the edges of the fabric from the inside.
- We connect the two parts of the scratching post with each other with furniture corners or tightly driven nails.
- For greater stability, it is better to place such a scratching post next to the wall.


Another fairly simple to manufacture (albeit short-lived) type of floor scratching post is made of cardboard. For him you need the following devices:
- pressed cardboard;
- stationery knife;
- glue;
- Scotch.
The procedure is as follows:
- we cut a sheet of pressed cardboard with a clerical knife into identical strips about 1 cm wide;
- glue them to each other with the smooth side so that the ribbed wavy edges of each strip are on top and bottom;
- wait for the glue to dry;
- and the final touch - we glue the resulting scratching post around the entire perimeter with tape to make the structure more durable.


The most popular type of cat scratcher is the post scratching post.
- To make it, you will need 1 sheet of chipboard, from which we will make a stand for the claw frame. For this purpose, you can use a former countertop, parts of an old cabinet or other furniture. The base should be wide and stable enough so that the cat does not overturn the entire structure during the game.
- The shape of the stand can be round, square or rectangular, at your discretion. If you choose the first option, then you will have to use a compass to first draw an even circle, and then cut it exactly around the circumference with a jigsaw.
- You can leave the base wooden as it is, but it is best to have some kind of covering so that cats can use it as a bed as well. You can upholster it with carpet or glue it with a jute rope, moving from the edges to the middle.
- If you want to make an additional bed at the top of the scratching post for your pet, then you will need another sheet of chipboard or plywood, equal in size to the bottom one.
- The post itself can be made from a metal pipe or several cans stacked on top of one another. We connect them to each other with glue, having previously placed some heavy object in the lowest one for the stability of the structure. Then we glue it over first with a carpet, and then with a rope. We connect the column to the base using furniture corners.
- If you make a column of wood, then it can be either round or rectangular. The average height is 60-80 cm. You can not tighten it or wrap it with a sisal or jute cord, having previously greased it with glue. It is attached to the base with nails or screws.
- At the top of the scratching post, hang the toy, fixing it at the end of the rope.


Almost everyone can do the above options for claws.
But to make a scratching post with a stove bench and a house, you will need at least minimal carpentry skills and, preferably, a partner.
- You will need 2 sheets of plywood: one larger (for the base), the second smaller (it will serve as a lounger and should be equal to the size of the cat in an extended state, both in length and in width).
- We take two wooden posts of the same diameter. One of them will be a stand for the house, the second will act as a scratching post, and a couch will also be located on it. The first should be much less than the second in height - about 30 centimeters.
- Screw both pillars to the base with self-tapping screws.
- We glue a large pillar and wind a jute or sisal rope around it.
- After the glue has dried, place a smaller sheet of plywood covered with carpet or furniture fabric at the top of the structure. The bed is ready.
- Having made the markings, we cut out the walls, ceiling and bottom of the future house from wood or plywood. They should be the same size, about 35 * 35 cm. Cut a round inlet, which we first draw with a compass. We nail all parts of the house to each other with nails. They can also be covered with fabric beforehand.
- In the center of the bottom of the house, mark the attachment points to the base pillar. For greater stability, you can attach it to the scratching post itself, having made markings on the wall first. We fasten the house with self-tapping screws.


If you have more than one cat, and you want to make the scratching post part of a play complex with several beds and houses, then you will need a preliminary drawing of the structure (for wooden and metal elements), as well as cutting (for fabric upholstery).
Diagrams of various models can be found on the Internet or created yourself.

Ideas for inspiration
The fair sex who want to pamper their furry pet with a play complex with a scratching post, but do not have the skills of a carpenter, should not despair! After all, you can make a cat's corner from cardboard. The material, of course, is short-lived, but it is very easy and quick to build even a whole castle for your pet from it!
We will make it out of boxes. In each of them we outline a round opening for the entrance and several smaller ones for ventilation (kind of door and window openings). First, we draw them with a compass, and then we cut them out with a clerical knife or scissors, as you like.
The boxes are stacked one on top of the other - you get a multi-storey dwelling. It is better to do no more than 3 floors, otherwise the structure will be unstable and can easily fall.

To compact all the planes of the houses and increase the life of the structure, we glue additional sheets of cardboard on them .
We make a scratching post from circles that we cut out by making small holes in the houses. We pierce each of them in the center with a nail or a screwdriver, then string them on a metal or wooden rod, for example, a pencil or sushi stick, and glue them together. If necessary, we cut a few more pieces. Having fixed the rope on the rod, we string the glued circles on it. At the edges we place circles of a larger diameter, which remained after cutting out doorways on the boxes, and fix them with knots on both sides.


 9 pictures
 We make two holes at the end of the bottom box at opposite ends and thread in a thread with cardboard beads-scratching posts. We connect the ends of the rope into a tight knot inside the box.
The final step is to glue the floors of the house together (the bottom of the lower one is glued to the ceiling of the upper one) and leave to dry for several hours. Then we give a house to the cat and watch how she settles in her new home!
As you can see, there are many options for scratching posts that you can make yourself.
You will not only delight your furry friend with a necessary and useful accessory, but also show your design and creative abilities!
To learn how to make a scratching post with your own hands, see the video below.